Tuesday, October 12, 2010

Back on Track! (Hopefully)

Hey, Gang!

I spoke with Den at Dobstuff.com recently, and he told me the move to Palm Desert went well, and he's all settled in. This means he will be restarting his production line next month, with possible delivery date on the structural kit by Christmas!

Now, I just have to raise the last few dollars I need to fund this shindig...

Being, so close, I would appreciate any help you guys can throw my way to get this project completed. I'll be stumping for donations from more local businesses, but let's keep our fingers crossed.

Also, I spoke with a 5th grade teacher at Penn Manor this week, and a 7th grade teacher from Dayspring, so it looks like we're also getting the event opportunities all lined up.

If you're interested in helping out with the kids and the events, contact me to get started with the appropriate paperwork and background checks for going into local schools as an educational volunteer.

One last thing to whet your telescope appetites:

Coming soon: Our 18" Kit Type from Dobstuff.com

Wednesday, August 4, 2010

Houston, the Mirror has Landed!

Good news, everyone! The mirror has arrived from OMI, and boy does it look awesome!


Now, I can concentrate on the main structure of the scope!

More updates soon!

Tuesday, June 29, 2010

Setbacks and Waiting

The telescope maker moved to Arizona, as I previously mentioned, but he also unexpectedly dumped his entire production line until November. Obviously, this is disappointing, but he assured me he is still in the business and will start back up in the fall. Here's hoping.

Otherwise, I have the primary mirror support and Crayford Focuser in hand, and OMI will deliver the primary mirror in two weeks. As far as monetary investment goes, 3/4ths of the scope is paid for, so things are cool enough for now.

There really isn't much more to report for now.

Saturday, May 1, 2010

Slow Progress

Well, it seems the past month has brought slow progress on the scope. The structural kit maker made a move from California to Arizona, which bumped back the completion date to June, and then I had several weeks of out of town business before I myself decided to move into a new apartment, which means little work has been done since March. But, it all worked out well, because I was burning the candle at too many ends. Thankfully, the primary still hasn't arrived yet, meaning there is plenty of time for everything to come together. Otherwise, everything else is complete. I anticipate kit arrival in July and completion by August 1st. A word of warning though; my wife is expecting our first child August 7th, so we're under a deadline! Anyway, things are progressing and all is well. More to come...

Saturday, March 20, 2010

18" Mirror Cell Completed

I finished the primary mirror cell this morning, and it looks great!

Here's the pics:


Friday, March 19, 2010

Imaging Problems

Okay, so I've been having problems with my junky Sony Cyber-Shot. Obviously, it was never designed for this sort of work, but I can't get it to focus. The views look great in the 4.25" Quattro eyepiece, and just for kicks, I re-collimated everything again last night before observing, but it just won't behave.

This regular 20-second shot of the northern sky shows you how much noise there is on the camera (that's not really light pollution):


This is the clearest image I could get of the moon:


Here is the clearest closeup I could get of Mare Crisium and the Proclus Crater:


To say that I'm not happy with my imaging options at the moment is an understatement, particularly when the scope itself is working so well. I guess I was just spoiled working at the University of Arizona Steward Observatory in college with all the good equipment there.

I am hoping to get things resolved before the 18" is completed in May, but for now, eyeball astronomy is quite rewarding enough. I just wanted to share some of those images online.

The idea for the 18" is to put together a DSLR and CCD gallery online for students to use in conjunctions with their science, astronomy, and physics classes. I hope I can get some sponsors on board to help with that.

Meanwhile, I'm back to tapping holes for the 18" primary mirror mount.

Thursday, March 18, 2010

Houston, We Have a Finder Scope!

Good news! I got an e-mail from Stellarvue, and they are donating an F2 Multi-reticle Finder to us!

This is a great boon for us, since the Dobtracker idea didn't work out so well. I'm still working on a source for a track and point system for Deep Sky Observing.

But here's a picture and link for you to check it out yourself:

Thanks, Vic and crew!

Wednesday, March 17, 2010

More Digital Imaging with Quattro

Nightly images with Sony DSC-W1 and Quattro 4.25" unguided Dobsonian:

Venus
Venus again
Venus yet again
Crescent Moon

Mirror Cell Construction: Day 1

I started the Mirror Cell today, beginning with the three cross bar supports that will sit under the triangles. It was just your basic drill 5/16" and tap 3/8-16 threads job. 21 more holes to drill and tap!

I also picked up most of the hardware as well.

More to follow. Here's the pics:


Tuesday, March 16, 2010

CCD Imaging with Quattro

So, I'm trying to squeeze some better performance out of my junky Sony DSC-W1. It's not a Canon 5000, but hey, I'm experimenting.

Check out this shot of the Pleiades (it's not bad for a 3 second exposure at F2.8 with a hand held shot against the 20mm eyepiece):

I'm hoping a t-adapter on the 18" will reveal wondrous images, but we'll see.

More to follow. Tomorrow, we're cracking on the primary mirror cell at Horizon Industries.

Mirror Cell Redux

Round 2 on the Mirror Cell:

Work is progressing. The PLOP calculations are complete, and I'm scrounging the local scrap yards for 1/4" Aluminum plate and 1" x 1/2" key stock for the bar joist.

I'll be using 3/8-16 Weld Nuts as the supports, as indicated by the awesome Bino-scope engineer Bruce Sayre on his website:

http://www.foothill.net/~sayre

Overall it should look something like this:

I'll post more pictures as I get things accomplished. I'm off to the scrap yard!

Sunday, March 14, 2010

Working on the Mirror Cell

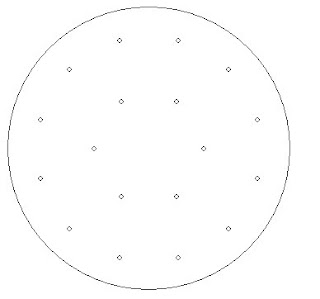
So, I've been working on the Primary Mirror Cell Design, and these are some of the candidates:


I think I've settled on the 18-point flotation design commonly used for a mirror this size, but I have had concerns about stability and mirror retention. After speaking with Dennis at Dobstuff, he assures me I don't need retention clamps or a sling, so I'm thinking about a basic bar-triangle design.

Here's what PLOP says:


I have plenty of metal, so either way, fabrication begins tomorrow!

Thursday, March 11, 2010

Meet the Mirror!

In an awesome development, I have come to an arrangement with a prominent telescope parabolic mirror maker (think one of the Big 3), and he is going to make an 18" f/4.5 mirror for me from one of his blemished stock in exchange for a 17" BK7 blank I have laying around.

Since I've been carting the thing around for 6 years now, I figured it was a fair trade, and although I'll probably never see another 17" x 1.35" chunk of BK7 in my life, I think it's making a good sacrifice in the name of project success.

Here's the BK7:


So, without further adieu, meet the mirror!


It's a 2" thick 18" blank with a chip and a scratch on it, and although it looks rough now, the optician is going to do a great job getting the mirror up to snuff! Besides, with a mirror this big, you're not even going to notice the slight decrease in gathering power. When properly finished, it will be just like having a perfect 17.5" mirror! As soon as everything is finalized, I will let you know who we have to thank for this AWESOMENESS!

Now to find the remaining needed parts! 

Down to Business on the 18" Scope

Okay, now that I've been able to assess my resources and gather the proverbial troops after the 4.25" rebuild, the time has come to buckle down on the 18" dobsonian telescope.

My main concern has been a potential cost overrun, one that I would have to foot out of my own pocket. Granted, I am willing to cover some operating expenses on this project, but having built two of these sort of telescopes before, I know how quickly things can get out of hand. So, I've done some brainstorming to cut costs but not corners.

My first concern has been tools and workshop capacity. Living in an apartment with a pregnant wife, I've had to rely quite heavily on the generosity of my in-laws and their ample garage and basement workshop space. However, niether they nor I have significant woodworking tools, namely jigs and dovetail stuff, and I have no real money for wood.

I did get some donated for the secondary cage rings, but that didn't go very far when it came down to it.

So, in the interest of efficiency, I looked around online for a kit or some similar shortcut to a traditional Dob. What I found was quite amazing, actually!

Dennis Steele at Dobstuff ( http://www.dobstuff.com/ ) sells reasonably priced, unfinished kits for this sort of project, and after talking with him on the phone, I think I'm going to go with one of his kits. This will save some invaluable time and could have me observing at local schools by the end of May. All I have to do is provide the following parts:
  • Crayford Focuser
  • Secondary Spider Mount
  • Secondary Mirror
  • Primary Mirror
  • Primary Mount
Bascically then, he sends me the pre-fitted kit, I stain and finish the wood, and then mount everything in the pre-drilled holes. It's so fairly simple that I'm actually really excited about the prospect of starting outreach by the start of summer!

The scope would look like this:


Since Moonlite was so generous in providing the focuser, all that remains for me to obtain are the optics and the spider!

More updates soon! I've got work to do!

Wednesday, March 10, 2010

Before and After Shots

In case you guys were interested in the overall transformation, I just wanted to post a before and after photo of the Quattro 4.25" Dobsonian rebuild. The results were awesome!

BEFORE: completed 06/01/2001

AFTER: rebuilt 03/09/2010

Next, I'm trying to figure out how to continue on the 18" scope without blowing the budget. Updates soon!

Tuesday, March 9, 2010

First Light

Well, I have taken Quattro for a midnight spin, and the results were decent. Granted, my camera isn't as good for nighttime shots as it is for park watching, since it can't subtract dark frames, but I have a few shots to share.

Betelguise

Sirius

Mars


Trapezium in the Orion Nebula

More to follow once I figure out how to get better night shots from my camera.

The Moment of Truth

At long last, with the 4.25" scope collimated and ready, I took some test shots. I pointed the scope at a local hilltop park about a mile or so away, and I was really blown away.

Here are the results:


I must say, I was quite impressed with the results of this rebuild, despite all the headaches in redesigning and overhauling a 10 year old scope. I would have preferred to replace the optics and go for an equatorial mount, but this isn't bad, especially if I end up using it for a secondary scope for those events with lots of kids wanting a turn at the eyepiece.

My last step will be to get two covers for the ends and finish wiring the cooling fan, but you can get an idea of the effect from thse pictures.

With this scope rebuilt, it's on the the 18"! I think the past few week have been good, because they've given me confidence to design and build on the 18" without worrying about too many issues.


Houston, We Have No Problems!

Well, the 4.25" Quattro rebuild is nearly completed (that's what I've named the scope, "Quattro").

I picked up the OTA from B & B Metal Finishing in York (those guys were just awesome!), and I rushed home to put everything together. Then, I started assembly, per the pictures.


Once the OTA was assembled with spider, helical focuser, pirmary mirror yoke, and cooling fan, I took the whole thing over to my in-laws' basement where I installed the OTA in the rocker box and velcro'ed the sucker in place. I quick balance rendered everything spiffy, and I finished off with a handsome brass patina knob for direction pointing.


Next, I broke out the allen wrenches and began collimation. Since I don't have a laser collimator right now, it was just by eyeball, but the results were passable.